MiBee Open Source Projects Series
Introduction
This article records the process of building a temperature and humidity monitor with an ESP01 + DHT11, covering hardware wiring, code implementation, and functional verification. The ESP01, a low-cost, low-power WiFi module, is well suited as a collection node.
Hardware Preparation
- ESP01 Board: Core control module, responsible for data collection and network communication.
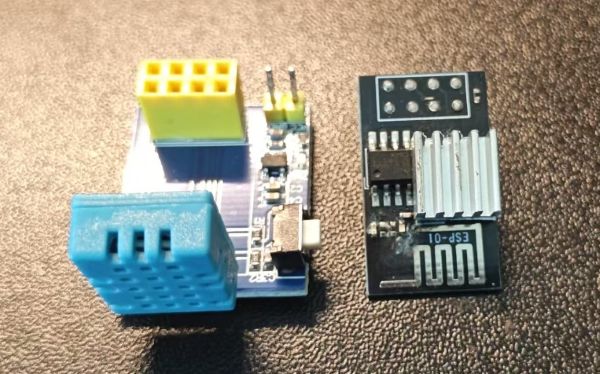
- DHT Temperature and Humidity Sensor: Used to measure ambient temperature and humidity.
- Dupont Wires: Used to connect the ESP01 and DHT sensor.
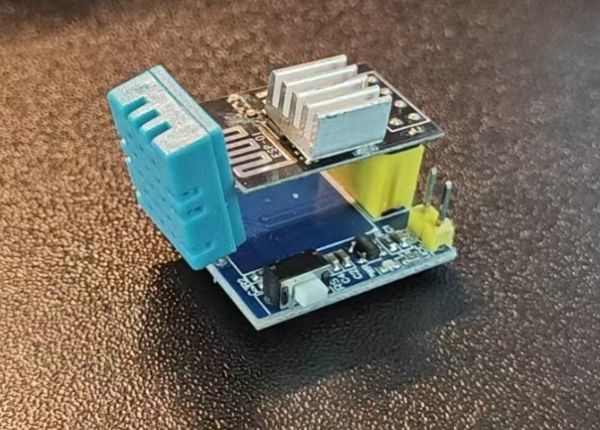
Connect the DHT sensor’s VCC pin to the ESP01’s 3.3V pin, the GND pin to GND, and the data pin to the designated pin on the ESP01 (defined as DHTPIN in the code).
Why
I have several LANs in different locations around the city, roughly 10 km apart. To make these networks talk to each other, I used tools like NetBird, ZeroTier, and Cloudflare Tunnel to set up a cross-region virtual LAN.
The network was set up, but how to ensure stability? After all, these tunnels traverse the public internet with varying link quality. The most direct approach is to use Prometheus’s blackbox_exporter for probing — periodic HTTP requests, Pings, DNS queries — feeding results into a time-series database with alert rules, so problems are detected immediately.
Why
We have a few parrots at home, and during the workday nobody’s around. I wanted to check in on them anytime. The requirement sounds simple: real-time video streaming, recording to storage, and ideally automatic backup to NAS. Off-the-shelf cameras are either expensive or require installing apps, registering accounts, and binding phone numbers — privacy concerns. I just want to watch my birds, not stream video to someone else’s server.
I have several cameras at home — a few Xiaomi cameras, some DIY ESP32 cameras, and multiple Raspberry Pi CSI cameras. I’d been using cloud storage solutions, but I was never comfortable with them: vendor lock-in, network dependency, and the costs add up. So I decided to build my own NVR system, called MiBeeNvr.
Why Build MiBeeNvr
To be honest, I was never satisfied with existing cloud storage solutions. Take Xiaomi cameras, for example. By default, you can only view them through the Mi Home app. Recordings are either stored on an SD card (limited capacity, frequent plugging/unplugging) or in the cloud. Cloud storage costs tens of dollars per month, and there’s the privacy concern — you never know when the manufacturer might use your video data for AI training or sell it to third parties. Not to mention vendor lock-in — switching platforms is nearly impossible.
Why
I built a surveillance camera with ESP32-S3 before, and it worked well. Later, while rummaging through a drawer, I found an AI-Thinker ESP32-CAM development board — that classic board costing about ten bucks with a built-in OV2640 camera and TF card slot. No reason to let it go to waste, so I built another one: ai-thinker-esp32-cam.
This time I wrote the firmware from scratch using ESP-IDF again, with similar capabilities to the previous project but with lots of adaptations for the AI-Thinker board. Here’s what it ended up doing:
The previous article introduced MiBeeNvr’s basic features and design philosophy. It’s only been a week since v0.1.0, and v0.2.0 follows right behind. This update is substantial — 15 new features, some I needed myself, others from community feedback.
This article covers three things: what’s new in v0.2.0, how to deploy from scratch, and some practical tips for real-world use.
v0.2.0 New Features Overview
This update has a lot of content. Here’s a breakdown by category:
Got Xiaomi cameras at home? Want to keep your recordings on your own storage instead of relying on the cloud?
As someone with several Xiaomi cameras at home, I always had one frustration: every time I wanted to check the footage from my doorbell camera, I had to log into Xiaomi Cloud, wait for ages while it loaded, and it would often just spin. Plus, cloud storage charges by the day — it adds up over the month. And if you swap cameras, all your old recordings are gone. Pretty frustrating.
#XQ|A lot of work went into the releases after v0.2.0. v0.3.x brings several major updates: native Xiaomi camera support, recording archiving, multi-protocol streaming architecture (WebRTC/HTTP-FLV/RTMP/SRT/LL-HLS), and a wave of security hardening. The architectural evolution from external dependencies to built-in implementation, from single protocol to full protocol support, was much more complex than I expected.
The previous post introduced v0.2.0’s 15 new features (v0.2.0 Update). If you haven’t read the first post, start with MiBeeNvr Introduction. v0.3.0 focuses on deep Xiaomi camera integration, and v0.3.1 builds on that with a complete multi-protocol streaming architecture. For the full changelog, see GitHub Release Notes.
Previously, MiBeeNvr’s MP4 files only had a video track — playback was silent. v0.4.0 fills this gap with audio recording. It also adds more practical camera health monitoring and auto-recovery.
Recordings Now Have Sound
Each camera can independently enable audio recording:
| |
Supported audio formats:
After v0.3.1 shipped, I put in another 196 commits. v0.4.0 is a feature-dense release: audio recording pipeline, multi-layer health monitoring engine, HLS/LL-HLS playback stability optimization, and a major UI redesign. For the full changelog, see GitHub Release Notes.
The previous post covered v0.3.x’s multi-protocol streaming and Xiaomi camera support (v0.3.0 Tech Post). If you haven’t read the first post, start with MiBeeNvr Introduction.
Audio Recording: From Silent to Sound
In the v0.3.x era, recorded MP4 files only had a video track. v0.4.0 introduces a complete audio capture and muxing pipeline, supporting AAC audio from RTSP cameras and G.711 audio from ONVIF/Xiaomi cameras.
Coming from an operations background, later transitioning to development, the number of projects I maintain keeps growing. Various middleware, databases, monitoring components… each version upgrade is a manual labor: go to the official site to find the download link, compare version numbers, manually download to the internal network, then distribute to each machine. I used to write a bunch of Shell scripts to periodically pull the latest versions to the LAN — functional but not user-friendly: scripts scattered everywhere, adding new software required writing parsing logic by hand, and there was nothing to check when things went wrong.
Less than a week after v0.4.0, another 31 commits were pushed. v0.5.0 is a feature-dense release: full ONVIF protocol support (covering all five major services: Device/Media/PTZ/Imaging/Event), hardware transcoding (H.265 → H.264), and recorder reconnection optimizations. 127 files changed, +24,509 / -730 lines. See the full changelog at GitHub Release Notes.
If you haven’t seen the previous versions, check out MiBeeNvr Introduction and v0.4.0 Technical Post.
Full ONVIF Protocol Support
v0.4.0 already had ONVIF device discovery and stream URL retrieval, but that was just the tip of the ONVIF iceberg. v0.5.0 completes the core services of ONVIF Profile S:
As a studio operator, the biggest pain point is never a specific problem — it’s the “not knowing” when devices multiply.
Not knowing which devices are alive, what services are running on them, whether a new machine has appeared on the network, whether a certain port is still open. This accumulated “not knowing” eventually becomes an outage.
My previous approach was a patchwork: Zabbix for monitoring, Nmap for scanning, Excel for asset tracking, Prometheus for metrics. Each tool is fine on its own, but together they’re a disaster — data silos, duplicate configuration, version drift, complex deployment.
After running continuous recording for a few weeks, storage became the first bottleneck. A single 1080p camera writes tens of GB per day — with a 30-day retention policy, a 1TB drive is mostly consumed. Many community members reported the same issue, and during discussions, the ideas of timelapse and transcoding storage gained the most traction: most of the time the scene is static, and compressing it with timelapse requires only 5% of the space for the same duration.
The concurrently released MiBeeNvr v0.6.0 brought major features like timelapse, video transcoding, and ONVIF enhancements. Unit tests alone are far from enough — the full workflow must be tested against real camera hardware. To provide reliable test machines for this release, three camera projects were updated on the same day, June 5th — both to supply testing environments for the NVR and to solve some typical embedded development engineering problems along the way.
After v0.6.0 put the timelapse pipeline in place, community feedback quickly pointed out several hard problems: the JPEG sequence consumed too much storage, H.265 cameras couldn’t generate playable timelapse segments, dual-lens Xiaomi devices could only capture the main lens, and H.265 HLS would occasionally panic outright. None of these are edge cases — the dual-lens CW500 and Outdoor Cam 4 ship in large volumes in China, and H.265 is the de facto standard for mid-to-high-end cameras. The v0.7.0 mainline was built around exactly this feedback.
To push camera feeds from the MiBee NVR project to a domestic live-streaming platform, there are three candidates: call FFmpeg directly, use the pure-Go gortmplib, or use go2rtc. All three “do RTMP”, but their behaviour against Chinese live-streaming platforms differs wildly — some disconnect instantly, some after a few seconds, some are rock solid. This post tears all three apart at the source level, and walks through the pitfalls and fixes for integrating with FMS-compatible domestic platforms.
When v0.1.0 shipped, I wrote that it answers three questions: what devices are on the network, what they are, and how they relate. Honestly, v0.1.0 only answered the first half well — and only for the one LAN the center sat on.
The real-world layout is messier: one subnet in the office, one in the server room, another at home for test machines. The center lives in the office and literally cannot see the cameras in the server room. Getting it to scan the server room means crossing subnets — either opening up SNMP routing or just moving the center over there. Neither is elegant.
Nine cameras had been running on a Banana Pi M5 for over six months, and the engineering debt accumulated since v0.6 had reached the point where it needed paying off. The /api/cameras endpoint would stall for 14.9 seconds while all 9 recorders started up — not because the traversal was slow, but because the cm.mu RWMutex was blocking, holding every read operation out. ONVIF camera addition still required typing in IP addresses manually, and with a household of CW500s, DS-2CD2047G2s, and others, every new camera meant opening a terminal session — not sustainable. FFmpeg as the only third-party binary dependency meant every deployment needed a check for whether it was installed, and on Raspberry Pi you also had to worry about hardware encoder compatibility. And the older Xiaomi devices — Dafang, Xiaofang, Aqara G2 — couldn’t be integrated at all because they speak the TUTK protocol. None of these are new technical challenges; they’re engineering debt, and v0.9 pays it off in one shot.
The previous post covered what v0.2.0 ships. This one covers why it’s designed that way — distributed consistency is the heaviest part of this release, and several seemingly casual decisions have specific trade-offs behind them.
The problem is clear: the center can only see its own LAN, but users have several. Dropping a center into every subnet isn’t realistic, so enter mibee-agent — a binary that only “scans local + reports to center.” But the moment an agent exists, it drags along a whole string of protocol questions: how to report, how to reconcile, how to detect offline, how not to overwhelm the center’s writes. Let’s take them one at a time.
Take over an unfamiliar LAN and the first thing you need is to figure out what’s on it — office, server room, and home subnets tangled together, no documentation left behind, a switch full of MACs nobody can name. MiBeeSteward exists for exactly that: scan the network and tell you what devices are there, what they are, and how they connect.
v0.3.0 goes after three specific pains left over from the last two releases:
The previous post covered what v0.3.0 ships. This one covers why — this release has three seemingly casual decisions with specific engineering trade-offs behind them: how the Docker network mode decides the scanner’s probe fidelity, why TLS cert-chain collection can cover eight protocols with one core, and why L2 topology needs three MIBs to assemble. Let’s take them one at a time.
Docker Network Mode vs Probe Fidelity
This is the hardest engineering finding in this release, and the reason v0.3.0 ships container images at all. Measured on the test LAN (31 devices):