eBPF系列之:DeepFlow 扩展协议解析实践(MongoDB协议与Kafka协议)
概述:
MongoDB 目前使用广泛,但是缺乏有效的可观测能力。
DeepFlow 在可观测能力上是很优秀的解决方案,但是却缺少了对 MongoDB 协议的支持。
该文是为 DeepFlow 扩展了 MongoDB 协议解析,增强 MongoDB 生态的可观测能力,简要描述了从协议文档分析到在 DeepFlow 内实现代码解析的过程拆解。
如何分析一个协议(MongoDB)
协议文档的分析思路
首先要从官方网站找到协议解析的文档,在协议文档
《mongodb-wire-protocol#standard-message-header》
中,可以看到MongoDB的协议头结构体描述如下:
| |
上述结构代码理解为下图所示:

注意,在协议文档 《mongodb-wire-protocol》 有一段说明,MongoDB协议是用了字节小端顺序。
Byte Ordering
All integers in the MongoDB wire protocol use little-endian byte order: that is, least-significant
接下来从实际的抓包看一下实际的数据是长什么样子的。
| |
上述的抓包数据简单拆解到如下信息:
- 字段
messageLength为a3 00 00 00:即 消息长度为a3- 字段
requestID为0a 50 88 48:即 请求ID为4888500a- 字段
responseTo为23 00 00 00:即 对ID为23的响应- 字段
opCode为dd 07 00 00:即 命令号为7dd,十进制是2013,对应协议文档中的OP_MSG指令。
MongoDB协议操作码说明表
| 操作码名称 | 操作码 | 操作码说明 | 额外说明 |
|---|---|---|---|
| OP_COMPRESSED | 2012 | 使用压缩 | |
| OP_MSG | 2013 | Send a message using the standard format. Used for both client requests and database replies. | |
| OP_REPLY | 1 | 通过responseTo指定响应客户端请求。 | Deprecated in MongoDB 5.0. Removed in MongoDB 5.1. |
| OP_UPDATE | 2001 | 更新文档 | Deprecated in MongoDB 5.0. Removed in MongoDB 5.1. |
| OP_INSERT | 2002 | 插入文档 | Deprecated in MongoDB 5.0. Removed in MongoDB 5.1. |
| RESERVED | 2003 | 略 | |
| OP_QUERY | 2004 | 查询文档 | Deprecated in MongoDB 5.0. Removed in MongoDB 5.1. |
| OP_GET_MORE | 2005 | 略 | Deprecated in MongoDB 5.0. Removed in MongoDB 5.1. |
| OP_DELETE | 2006 | 删除文档 | Deprecated in MongoDB 5.0. Removed in MongoDB 5.1. |
| OP_KILL_CURSORS | 2007 | 略 | Deprecated in MongoDB 5.0. Removed in MongoDB 5.1. |
对最常见的操作码OP_MSG分析
从协议文档
《mongodb-wire-protocol#op_msg》
查看OP_MSG的结构体
| |
OP_MSG需要关注的解码内容在Sections,只需要判断kind为0和1的情况,其中:
- 0:后面直接用
BSON解码;- 1:先偏移
int32和c_string占用的byte后,用BSON解码后面的内容

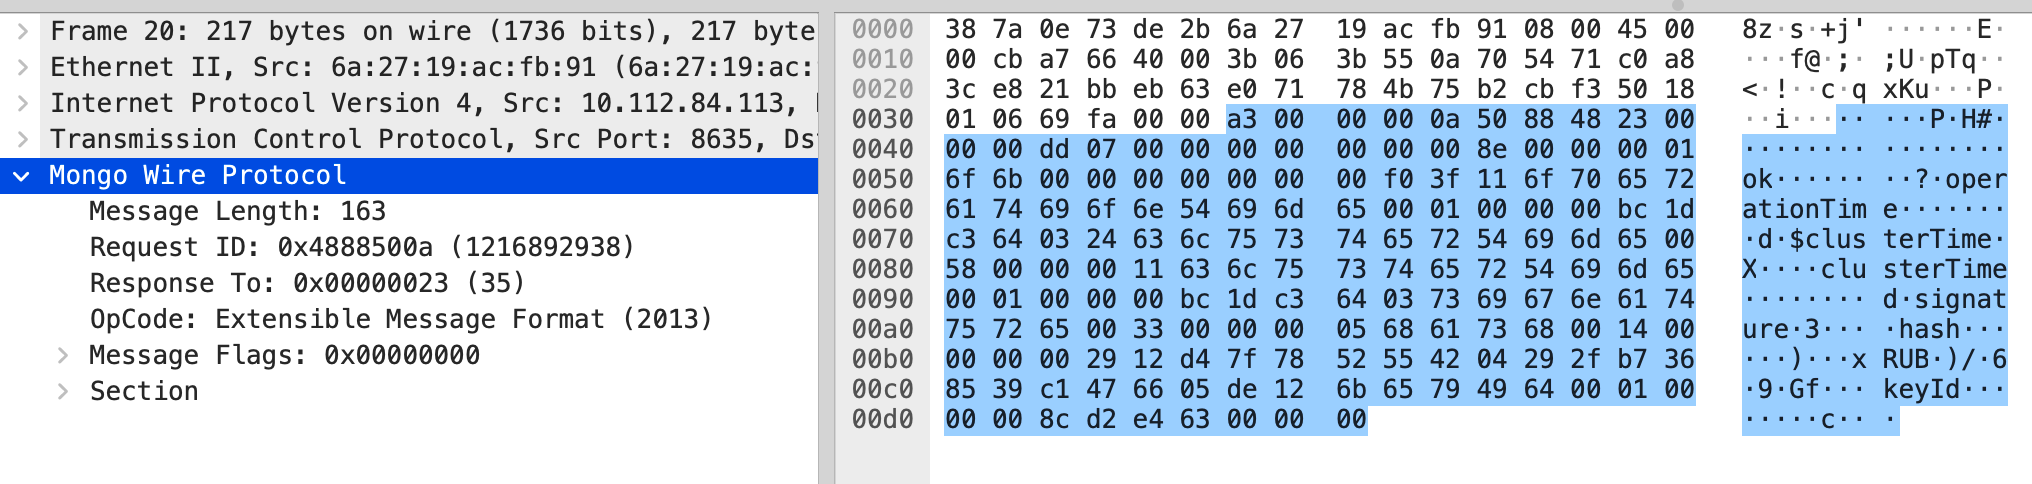
从实际抓包看一下原始数据。如下所示,MongoDB协议的操作码OP_MSG内容从第十六(从0开始数,后续文档统一按此规律)字节开始。
| |
不需要关心字段
flagBits,偏移4个字节后从第四个字节判断字段kind类型。由此判断后面为BSON结构数据。
到这里我们已经基本了解到MongoDB协议的数据结构和解码思路了,接下来我们开始在DeepFlow Agent中尝试实现解码观察。
在DeepFlow Agent扩展一个协议解析采集
DeepFlow Agent的开发文档概要
前提,
DeepFlow Agent的原生开发需要掌握Rust语言的基础开发能力。 接下来先参考官方文档 《HOW_TO_SUPPORT_YOUR_PROTOCOL_CN》 了解几个关键信息
L7Protocol用于标识协议常量 源码位置:deepflow/agent/crates/public/src/l7_protocol.rsL7ProtocolParser主要用于协议判断和解析出L7ProtocolInfo(七层协议的基础结构信息) 源码位置:deepflow/agent/src/common/l7_protocol_log.rsL7ProtocolInfo由L7ProtocolParser解析出来,并且用于后续会话聚合 源码位置:deepflow/agent/src/common/l7_protocol_info.rsL7ProtocolInfoInterface七层协议结构L7ProtocolInfo都需要实现这个接口来处理特征逻辑 源码位置:deepflow/agent/src/common/l7_protocol_info.rsL7ProtocolSendLog统一发送到deepflow-server的结构 源码位置:deepflow/agent/src/flow_generator/protocol_logs/pb_adapter.rs
在
deepflow-agent中开发的大致步骤:
- 在
“deepflow/agent/crates/public/src/l7_protocol.rs”添加对应协议名称和协议号。L7ProtocolParser::parse_payload()需要返回L7ProtocolInfo,所以需要先定义一个结构,实现L7ProtocolInfoInterface接口并且添加到L7ProtocolInfo这个枚举。- 实现
L7ProtocolParserInterface接口,并添加到“deepflow/agent/src/common/l7_protocol_log.rs”中的impl_protocol_parser!宏。- 在
deepflow-server中只需增加一个常量用于搜索提示即可。
代码指引
定义一个协议,并用一个常量标识。
源码位置:
deepflow/agent/crates/public/src/l7_protocol.rs,Agent通过遍历所有支持协议判断一个流的应用层协议。 这里说明一下,由于业界的通用应用协议没有一个约束字段来定义应用协议类型,所以在大量网络包是通过遍历已知协议解码逻辑来判断应用层协议的。
| |
| |
为新协议准备解析逻辑
定义结构体
在“deepflow/agent/src/flow_generator/protocol_logs/”该路径下找一个目录建立相关的协议解析逻辑代码文件,该案例的代码文件放在上述目录下的“sql/mongo.rs”。
| |
实现 L7ProtocolParserInterface
- 先看源码结构逻辑(以下只显示需处理函数,不需处理的保留默认逻辑即可)
| |
解码协议的第一步是如何识别协议,代码中需处理
L7ProtocolParserInterface::check_payload()逻辑- 定义
MongoDB协议头并解码
1 2 3 4 5 6 7 8 9 10 11 12 13 14 15 16 17 18 19 20 21// 定义MongoDB协议头结构体,并对必要信息字段一一解码 #[derive(Clone, Debug, Default, Serialize)] pub struct MongoDBHeader { length: u32, request_id: u32, response_to: u32, op_code: u32, op_code_name: String, } impl MongoDBHeader { fn decode(&mut self, payload: &[u8]) -> isize { // 对payload前16位以MongoDBHeader结构解码,判断是否符合MongoDB的协议 } fn is_request(&self) -> bool { // 解码op_code判断是否request } pub fn get_op_str(&self) -> &'static str { // 解码op_code出对应文本描述 } }- 在
L7ProtocolParserInterface::check_payload()调用MongoDB协议头解码逻辑 在此过程,把protocol(&self)和parsable_on_udp(&self)也一并处理。
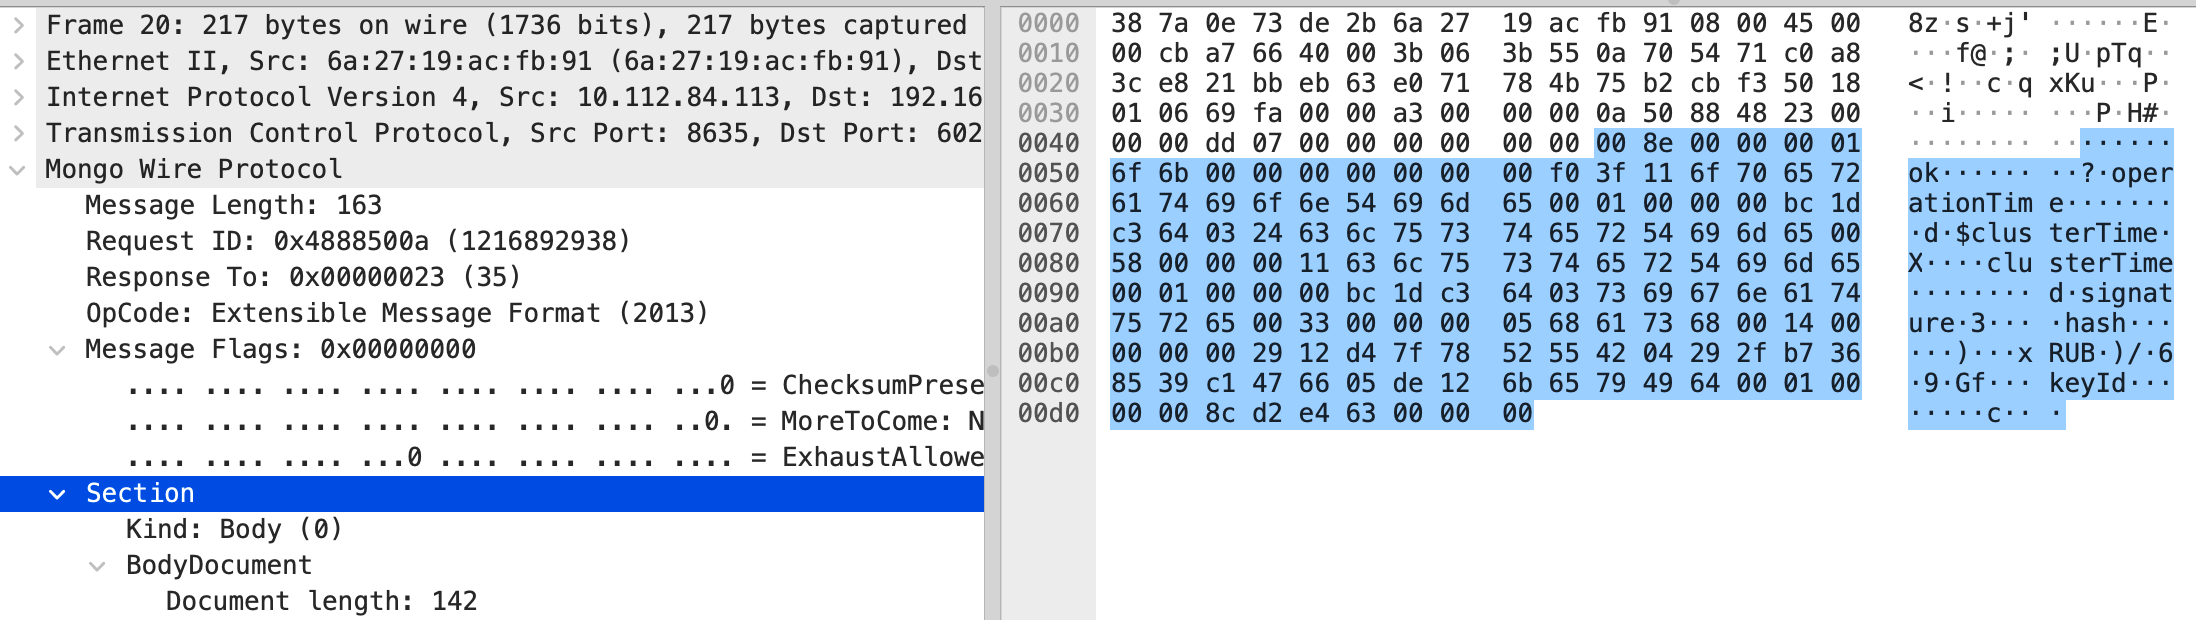
1 2 3 4 5 6 7 8 9 10 11 12impl L7ProtocolParserInterface for MongoDBLog { fn check_payload(&mut self, payload: &[u8], param: &ParseParam) -> bool { let mut header = MongoDBHeader::default(); header.decode(payload); return header.is_request(); } fn protocol(&self) -> L7Protocol { L7Protocol::MongoDB } // udp协议的跳过解码 fn parsable_on_udp(&self) -> bool {false} }- 第一步的效果展示
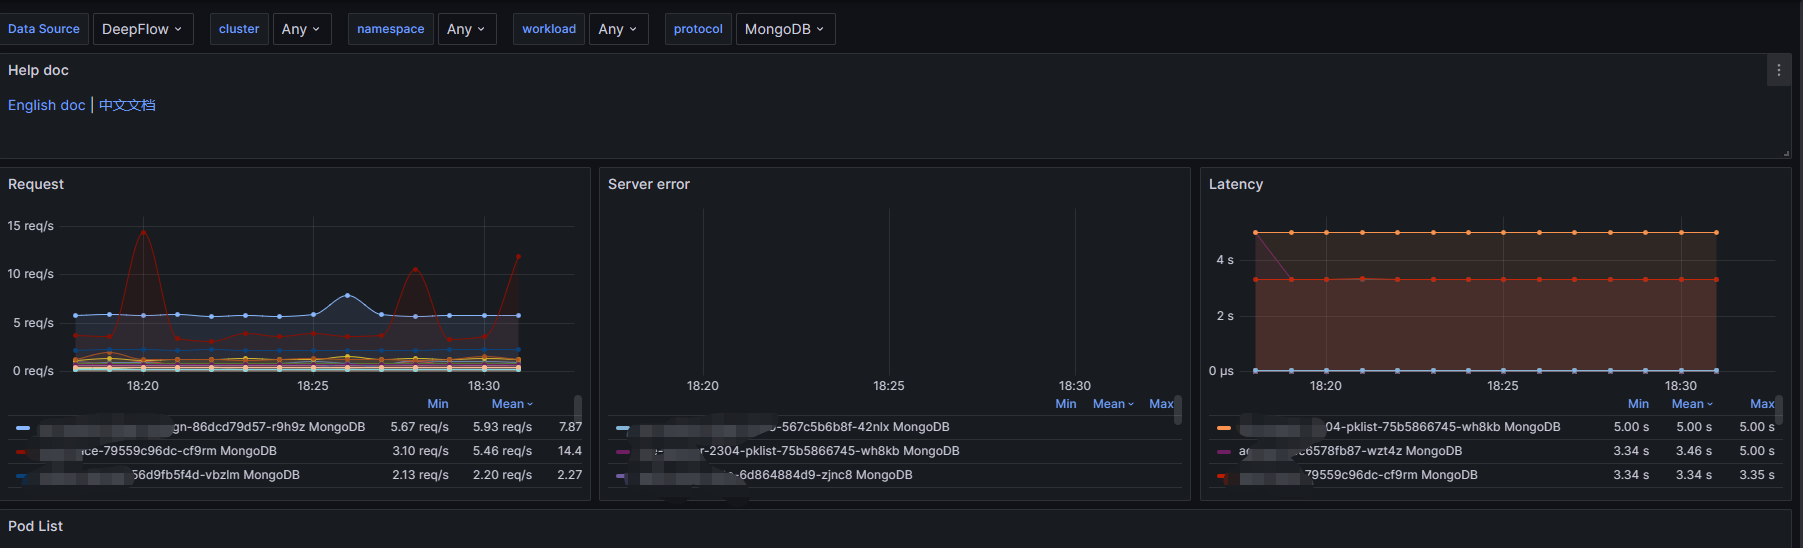
到这一步的解码将会得到如下展示效果,接下来还需要对具体的协议操作码做进一步解码。

- 定义
解码协议的第二步是对关键指令定义结构体和解码接口逻辑实现,对应处理是
L7ProtocolParserInterface::parse_payload()代码实现,这里以OP_MSG为例- 定义
OP_MSG操作码的结构体并解码
1 2 3 4 5 6 7 8 9 10 11 12 13 14 15#[derive(Clone, Debug, Default, Serialize)] pub struct MongoOpMsg { flag: u32, sections: Sections, checksum: Option<u32>, } impl MongoOpMsg { fn decode(&mut self, payload: &[u8]) -> Result<bool> { // 略过偏移逻辑 let _ = sections.decode(&payload); self.sections = sections; Ok(true) } }- 对
OP_MSG操作码中业务需要关注的字段Sections做进一步解码
1 2 3 4 5 6 7 8 9 10 11 12 13 14 15 16 17 18 19 20 21 22#[derive(Clone, Debug, Default, Serialize)] struct Sections { kind: u8, kind_name: String, // kind: 0 mean doc doc: Document, // kind: 1 mean body size: Option<i32>, c_string: Option<String>, } impl Sections { pub fn decode(&mut self, payload: &[u8]) -> Result<bool> { match self.kind { 0 => {// Body} 1 => {// Doc} 2 => {// Internal} _ => {// Unknown} } Ok(true) } }- 处理
L7ProtocolParserInterface::parse_payload,返回L7ProtocolInfo
1 2 3 4 5 6 7 8 9 10 11 12 13 14 15 16 17 18 19 20 21 22 23 24 25#[derive(Clone, Debug, Default, Serialize)] pub struct MongoDBLog { info: MongoDBInfo, #[serde(skip)] perf_stats: Option<L7PerfStats>, } impl L7ProtocolParserInterface for MongoDBLog { fn parse_payload(&mut self, payload: &[u8], param: &ParseParam) -> Result<L7ParseResult> { let mut info = MongoDBInfo::default(); self.parse(payload, param.l4_protocol, param.direction, &mut info)?; // 解码得到L7ProtocolInfo } } impl MongoDBLog { fn parse(&mut self,payload:&[u8],proto:IpProtocol,dir:PacketDirection,info:&mut MongoDBInfo,)-> Result<bool> { // 解码指令获取请求和响应等信息} // command decode match info.op_code { _OP_MSG if payload.len() > _MSG_DOC_SECTION_OFFSET => { // OP_MSG let mut msg_body = MongoOpMsg::default(); // TODO: Message Flags msg_body.decode(&payload[_MSG_DOC_SECTION_OFFSET..])?; } } } }- 为
MongoDBInfo实现L7ProtocolInfoInterface
1 2 3 4 5 6 7 8 9 10 11 12 13 14 15 16 17 18 19 20 21impl L7ProtocolInfoInterface for MongoDBInfo { fn session_id(&self) -> Option<u32> { // 这里返回流标识id,例如 http2 返回 streamid,dns 返回 transaction id,如果没有就返回 None } fn merge_log(&mut self, other: L7ProtocolInfo) -> Result<()> { // 这里的self必定是请求,other必定是响应 if let L7ProtocolInfo::MongoDBInfo(other) = other { self.merge(other); } Ok(()) } fn app_proto_head(&self) -> Option<AppProtoHead> { // 这里返回一个 AppProtoHead 结构,返回 None 直接丢弃这段数据 Some(AppProtoHead { proto: L7Protocol::MongoDB, }) } fn is_tls(&self) -> bool { self.is_tls } }- 为
MongoDBInfo实现L7ProtocolSendLog
1 2 3 4 5 6 7 8 9 10 11 12 13 14 15 16 17 18 19 20impl From<MongoDBInfo> for L7ProtocolSendLog { fn from(f: MongoDBInfo) -> Self { let log = L7ProtocolSendLog { // 这里需要把 info 转换成统一的发送结构 L7ProtocolSendLog }; return log; } } // 参考源码来自:deepflow/agent/src/flow_generator/protocol_logs/pb_adapter.rs pub struct L7ProtocolSendLog { pub req_len: Option<u32>, pub resp_len: Option<u32>, pub row_effect: u32, pub req: L7Request, pub resp: L7Response, pub version: Option<String>, pub trace_info: Option<TraceInfo>, pub ext_info: Option<ExtendedInfo>, }- 把实现
L7ProtocolParserInterface的接口,添加到deepflow/agent/src/common/l7_protocol_log.rs中的impl_protocol_parser!宏。
1 2 3 4 5 6 7 8 9 10 11 12 13 14 15 16 17impl_protocol_parser! { pub enum L7ProtocolParser { // http have two version but one parser, can not place in macro param. // custom must in frist so can not place in macro DNS(DnsLog), SofaRPC(SofaRpcLog), MySQL(MysqlLog), Kafka(KafkaLog), Redis(RedisLog), + MongoDB(MongoDBLog), PostgreSQL(PostgresqlLog), Dubbo(DubboLog), FastCGI(FastCGILog), MQTT(MqttLog), // add protocol below } }- 第二步的效果
- 定义
通过
perf_states统计记录QPS、耗时和异常情况
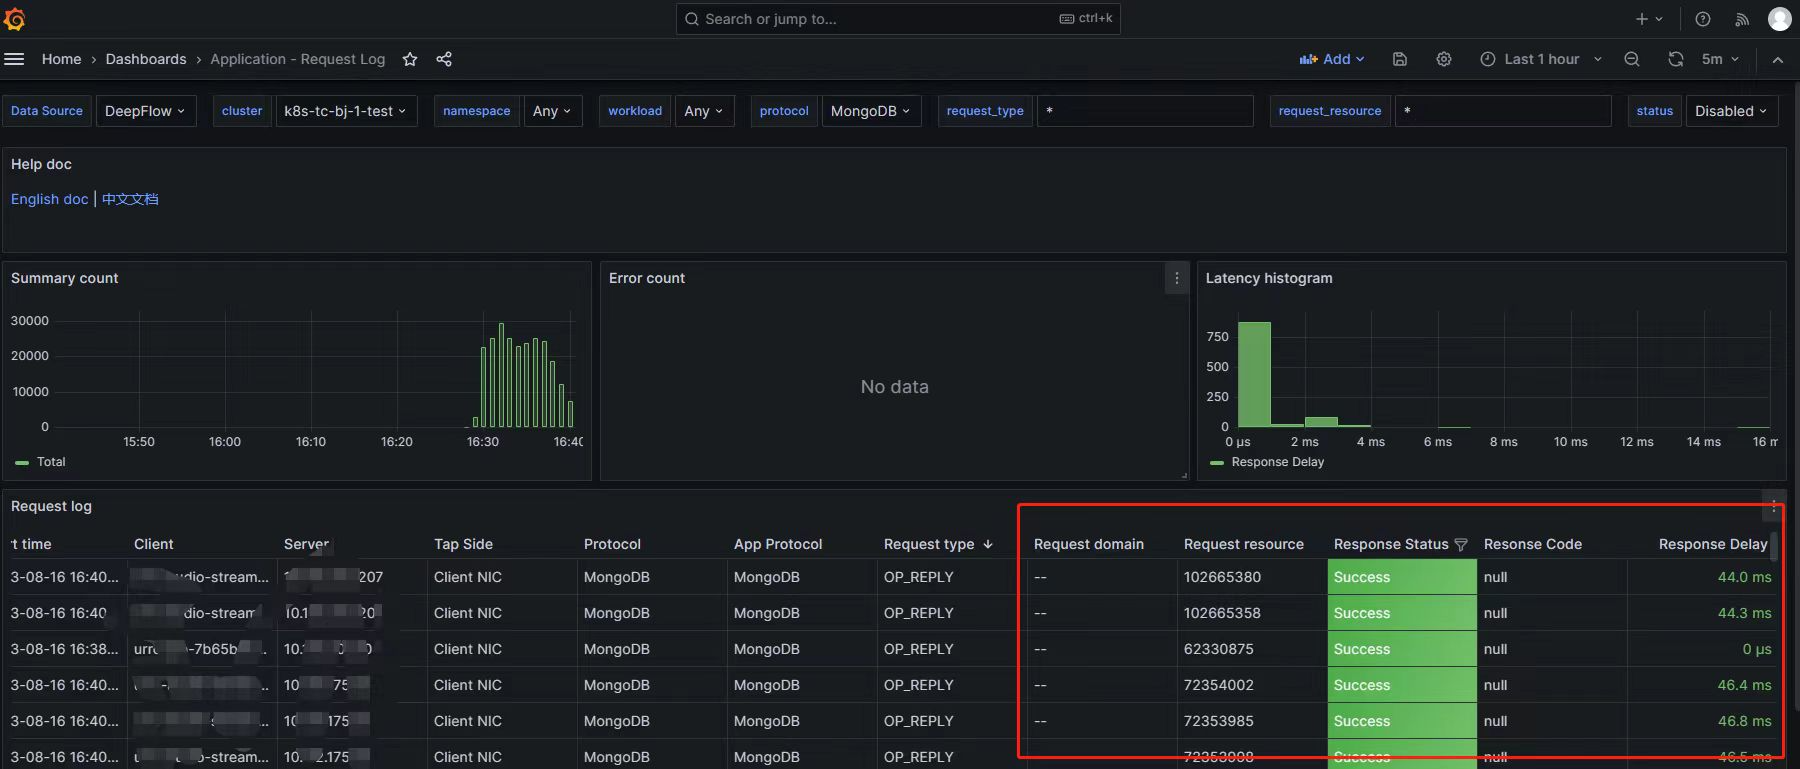
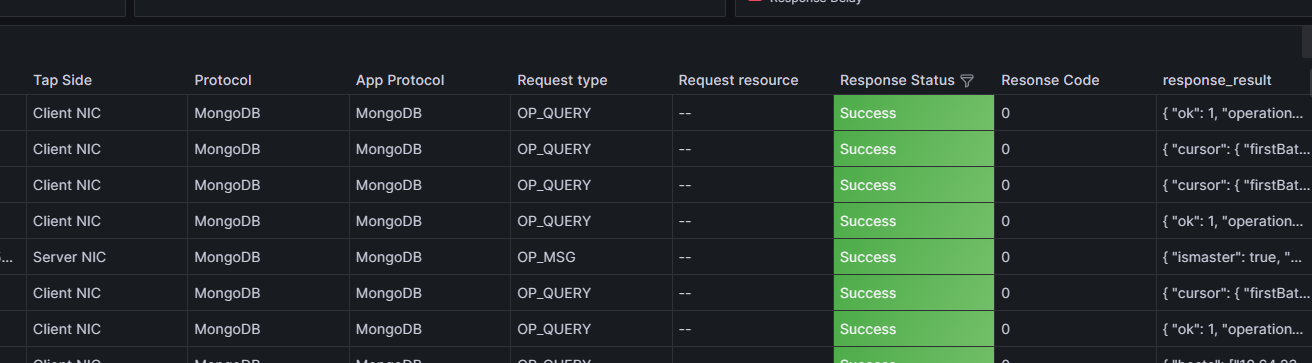
| |
效果如图:
- 最后在
server补充服务端的协议识别 以下两部分内容在代码文件server/libs/datatype/flow.go中
| |
| |
server/querier/db_descriptions/clickhouse/tag/enum/l7_protocol
| |
到这里已经完成DeepFlow Agent的原生协议扩展了,参考《
# 完整指南:如何编译、打包和部署二次开发的 DeepFlow
》编译程序发布即可。
如果想快速实现一个协议采集解析,或者不熟悉Rust语言呢?我们还有一个选择,就是利用Wasm插件快速扩展协议解码。
利用Wasm插件扩展DeepFlow的协议采集
该案例是用
Wasm扩展Kafka协议支持Topic的实践。 首先还是参考Kafka的官方文档对 Kafka协议 做一个简单的分析
Kafka协议分析
Kafka的Header和Data概览

Kafka的Fetch API

Kafka的Produce API

Kafka协议DeepFlow Agent原生解码
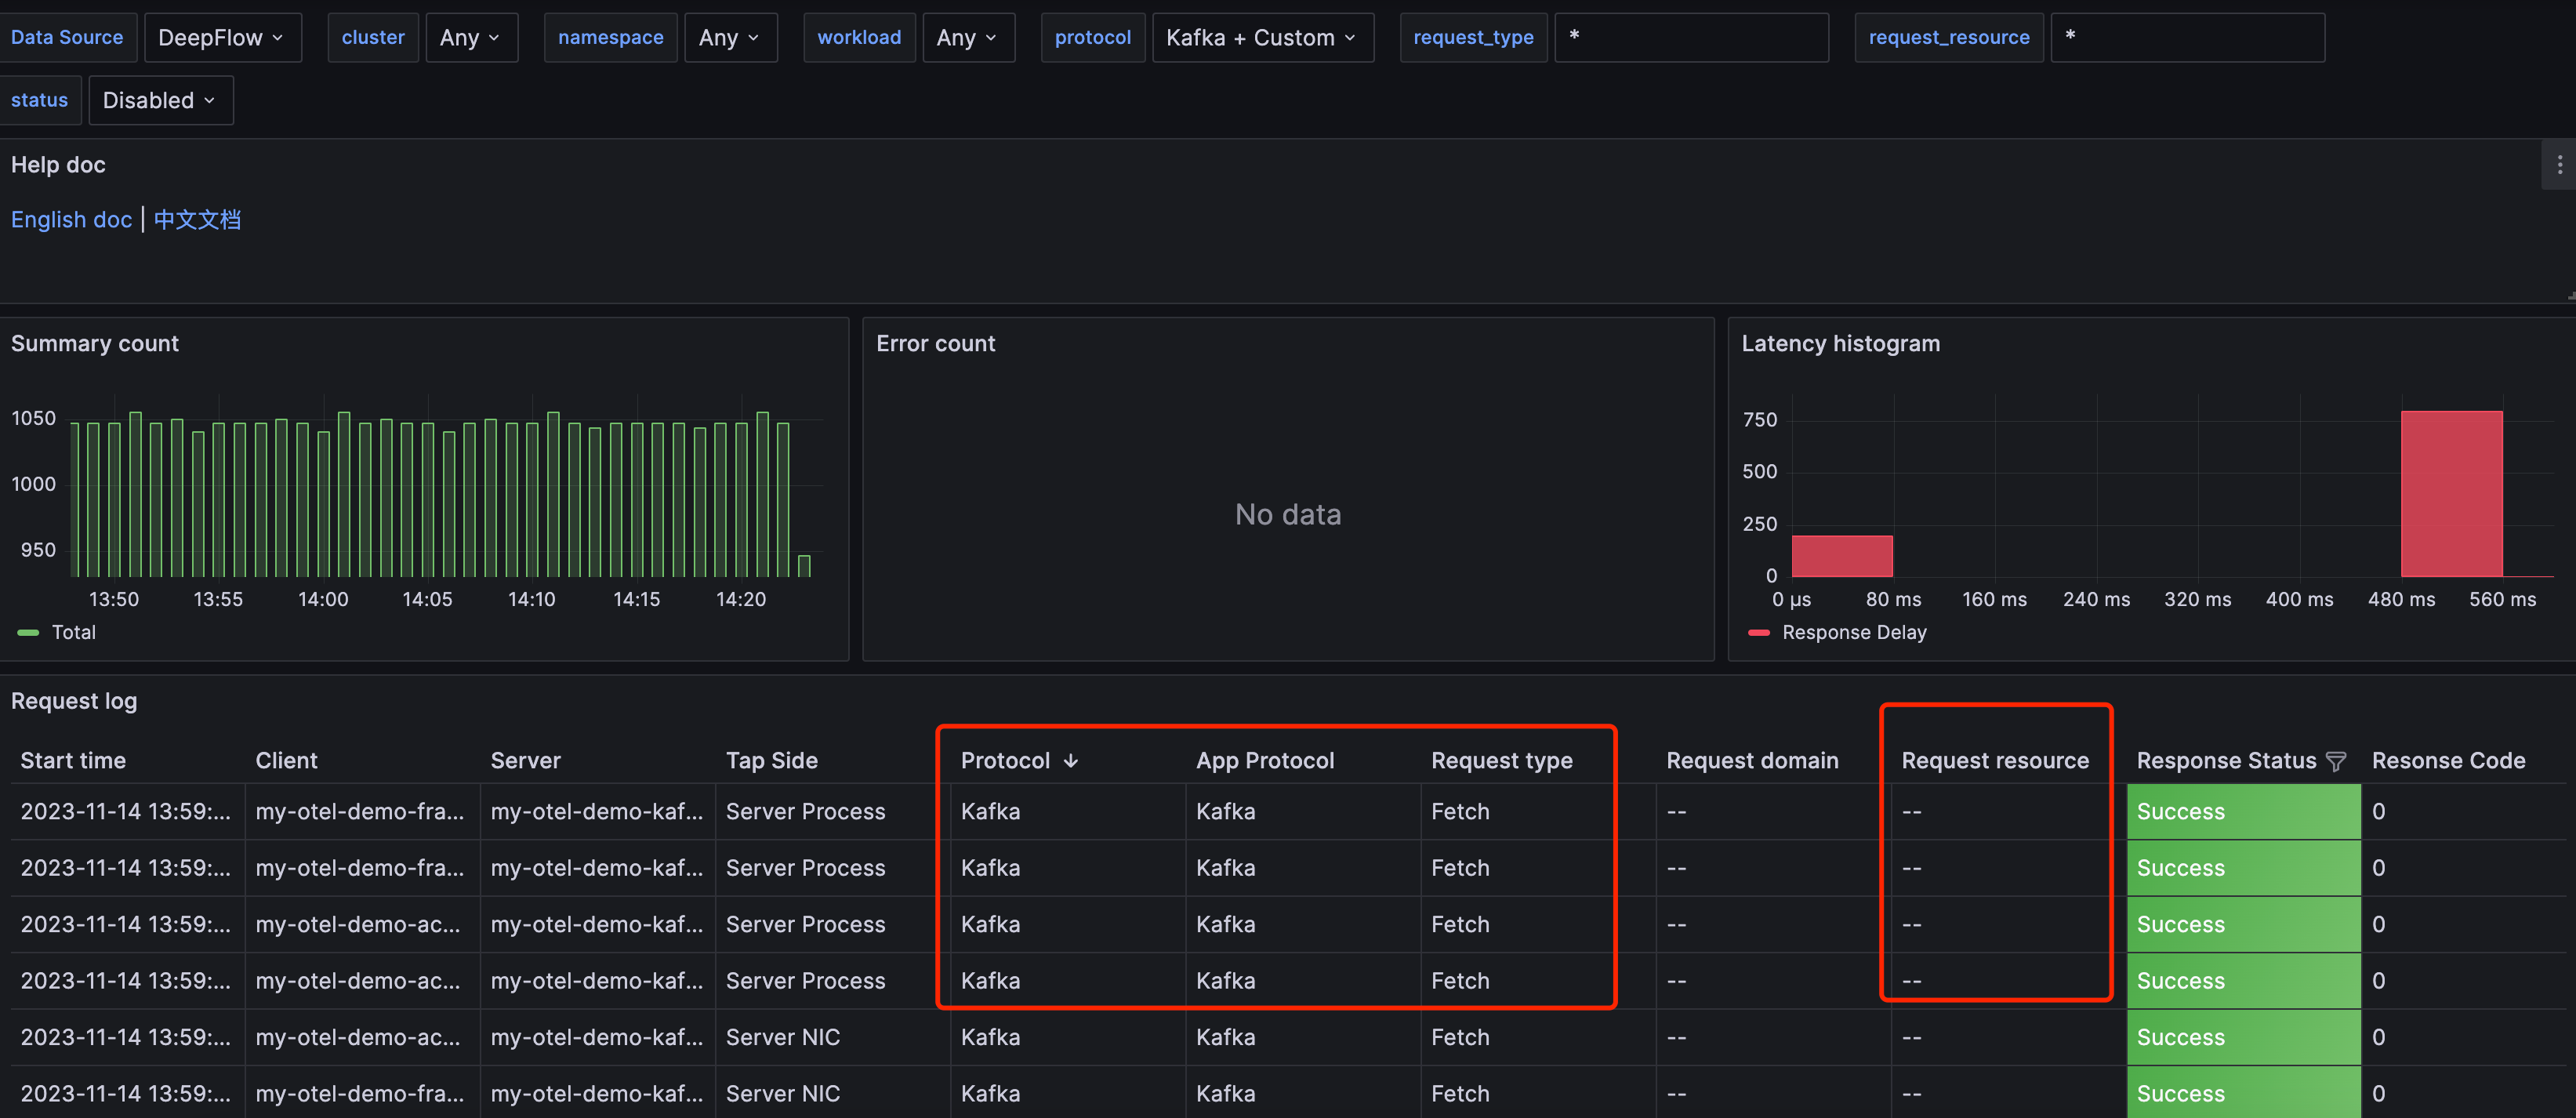
截止到v6.3.x版本,DeepFlow Agent对Kafka的原生解码如下图所示,还不支持Topic字段的解码, 且API的解码还没有版本号。 接下来的插件开发主要解决Topic字段的解码放在resource展示,同时把API的版本号也解析出来。
DeepFlow Agent的 Wasm 插件
参考官方插件文档《 wasm-plugin 》,需要注意两点:
Agent通过遍历所有支持协议判断一个流的应用层协议,顺序是:HTTP->Wasm Hook->DNS-> …需要使用
Go版本不低于1.21并且tinygo版本需要不低于0.29
Wasm Go SDK 的框架
- 先对框架有一个大概的认识,如下代码所示,整个框架逻辑都在以下五个接口函数。
| |
- Agent 会遍历所有插件调用对应的 Export 函数,但是遍历的行为可以通过返回值控制
| 返回值 | 说明 |
|---|---|
| sdk.ActionNext() | 停止当前插件,直接执行下一个插件 |
| sdk.ActionAbort() | 停止当前插件并且停止遍历 |
| sdk.ActionAbortWithErr(err) | 停止当前插件,打印错误日志并且停止遍历 |
| sdk.HttpActionAbortWithResult() | Agent 停止遍历并且提取相应返回结果 |
| sdk.ParseActionAbortWithL7Info() | Agent 停止遍历并且提取相应返回结果 |
⚠️注意: 因为该案例不涉及
HTTP协议的处理,所以OnHttpReq()和OnHttpResp()直接使用sdk.ActionNext()跳过即可。 该案例也不会用到sdk.HttpActionAbortWithResult()。
HookBitmap的三个hook点
| hook点 | 说明 |
|---|---|
| HOOK_POINT_HTTP_REQ | 表示 http 请求解析完成返回之前 |
| HOOK_POINT_HTTP_RESP | 表示 http 响应解析完成返回之前 |
| HOOK_POINT_PAYLOAD_PARSE | 表示协议的判断和解析 |
⚠️注意: 因为该案例不涉及
HTTP协议的处理,所以HOOK_POINT_HTTP_REQ和HOOK_POINT_HTTP_RESP在 该案例也不会用到。
插件代码指引
- 梳理后的
Kafka协议的Wasm插件代码框架
| |
- 协议识别
⚠️注意:以下代码注释
| |
协议API解码
- 官方代码框架
OnParsePayload()的逻辑如下
1 2 3 4 5 6 7 8 9 10 11 12 13 14 15 16 17 18 19 20 21 22 23 24 25 26 27 28 29 30 31func (p plugin) OnParsePayload(baseCtx *sdk.ParseCtx) sdk.ParseAction { // ctx.L7 就是 OnCheckPayload 返回的协议号,可以先根据4层协议或协议号过滤。 if ctx.L4 != sdk.TCP {return sdk.ActionNext()} payload, err := ctx.GetPayload() if err != nil {return sdk.ActionAbortWithErr(err)} // the parse logic here // ... /* 关于 L7ProtocolInfo 结构: type L7ProtocolInfo struct { ReqLen *int // 请求长度 例如 http 的 content-length RespLen *int // 响应长度 例如 http 的 content-length RequestID *uint32 // 子流的id标识,例如 http2 的 stream id,dns 的 transaction id Req *Request Resp *Response Trace *Trace // 跟踪信息 Kv []KeyVal // 对应 attribute } type Request struct { ReqType string // 对应请求类型 Domain string // 对应请求域名 Resource string // 对应请求资源 Endpoint string // 对应 endpoint } type Response struct { Status RespStatus // 对应响应状态 Code *int32 // 对应响应码 Result string // 对应响应结果 Exception string // 对应响应异常 }*/ return sdk.ParseActionAbortWithL7Info([]*sdk.L7ProtocolInfo{}) }- Topic字段解码的代码逻辑
1 2 3 4 5 6 7 8 9 10 11 12 13 14 15 16 17 18 19 20 21 22 23 24 25 26 27 28 29 30 31func (p kafkaParser) OnParsePayload(ctx *sdk.ParseCtx) sdk.Action { // the parse logic here // ... // 解码 header base size : // req_len(int32) + api_key(int16) + api_ver(int16) + c_id(int32) + client_len(int16) // = 14 var header_offset = 14 + header.clientLen var topic_size int16 = 0 var topic_name = "" switch protocol.ApiKey(header.apikey) { case protocol.Produce: topic_size, topic_name = decodeProduce(header.apiversion, payload[header_offset:]) case protocol.Fetch: topic_size, topic_name = decodeFetch(header.apiversion, payload[header_offset:]) } if topic_size == 0 { return sdk.ActionNext() } req = &sdk.Request{ ReqType: protocol.ApiKey(header.apikey).String() + "_v" + strconv.Itoa(int(header.apiversion)), Resource: topic_name, } return sdk.ParseActionAbortWithL7Info([]*sdk.L7ProtocolInfo{ { RequestID: &id, ReqLen: &length, Req: req, }, }) }- 官方代码框架
加载插件和效果展示
执行如下命令编译插件,通过CTL方式加载插件
| |
准备好Agent的配置文件增加如下配置。注意,Agent可以加载多个 Wasm 插件。
| |
执行命令更新配置
| |
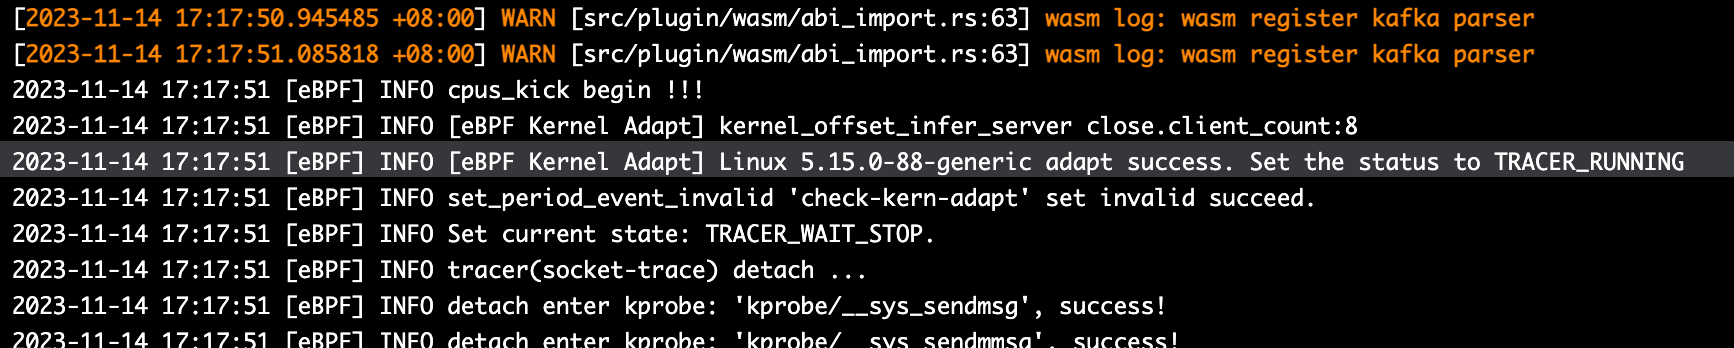
当Agent日志出现如下图黄字体内容,即加载成功。
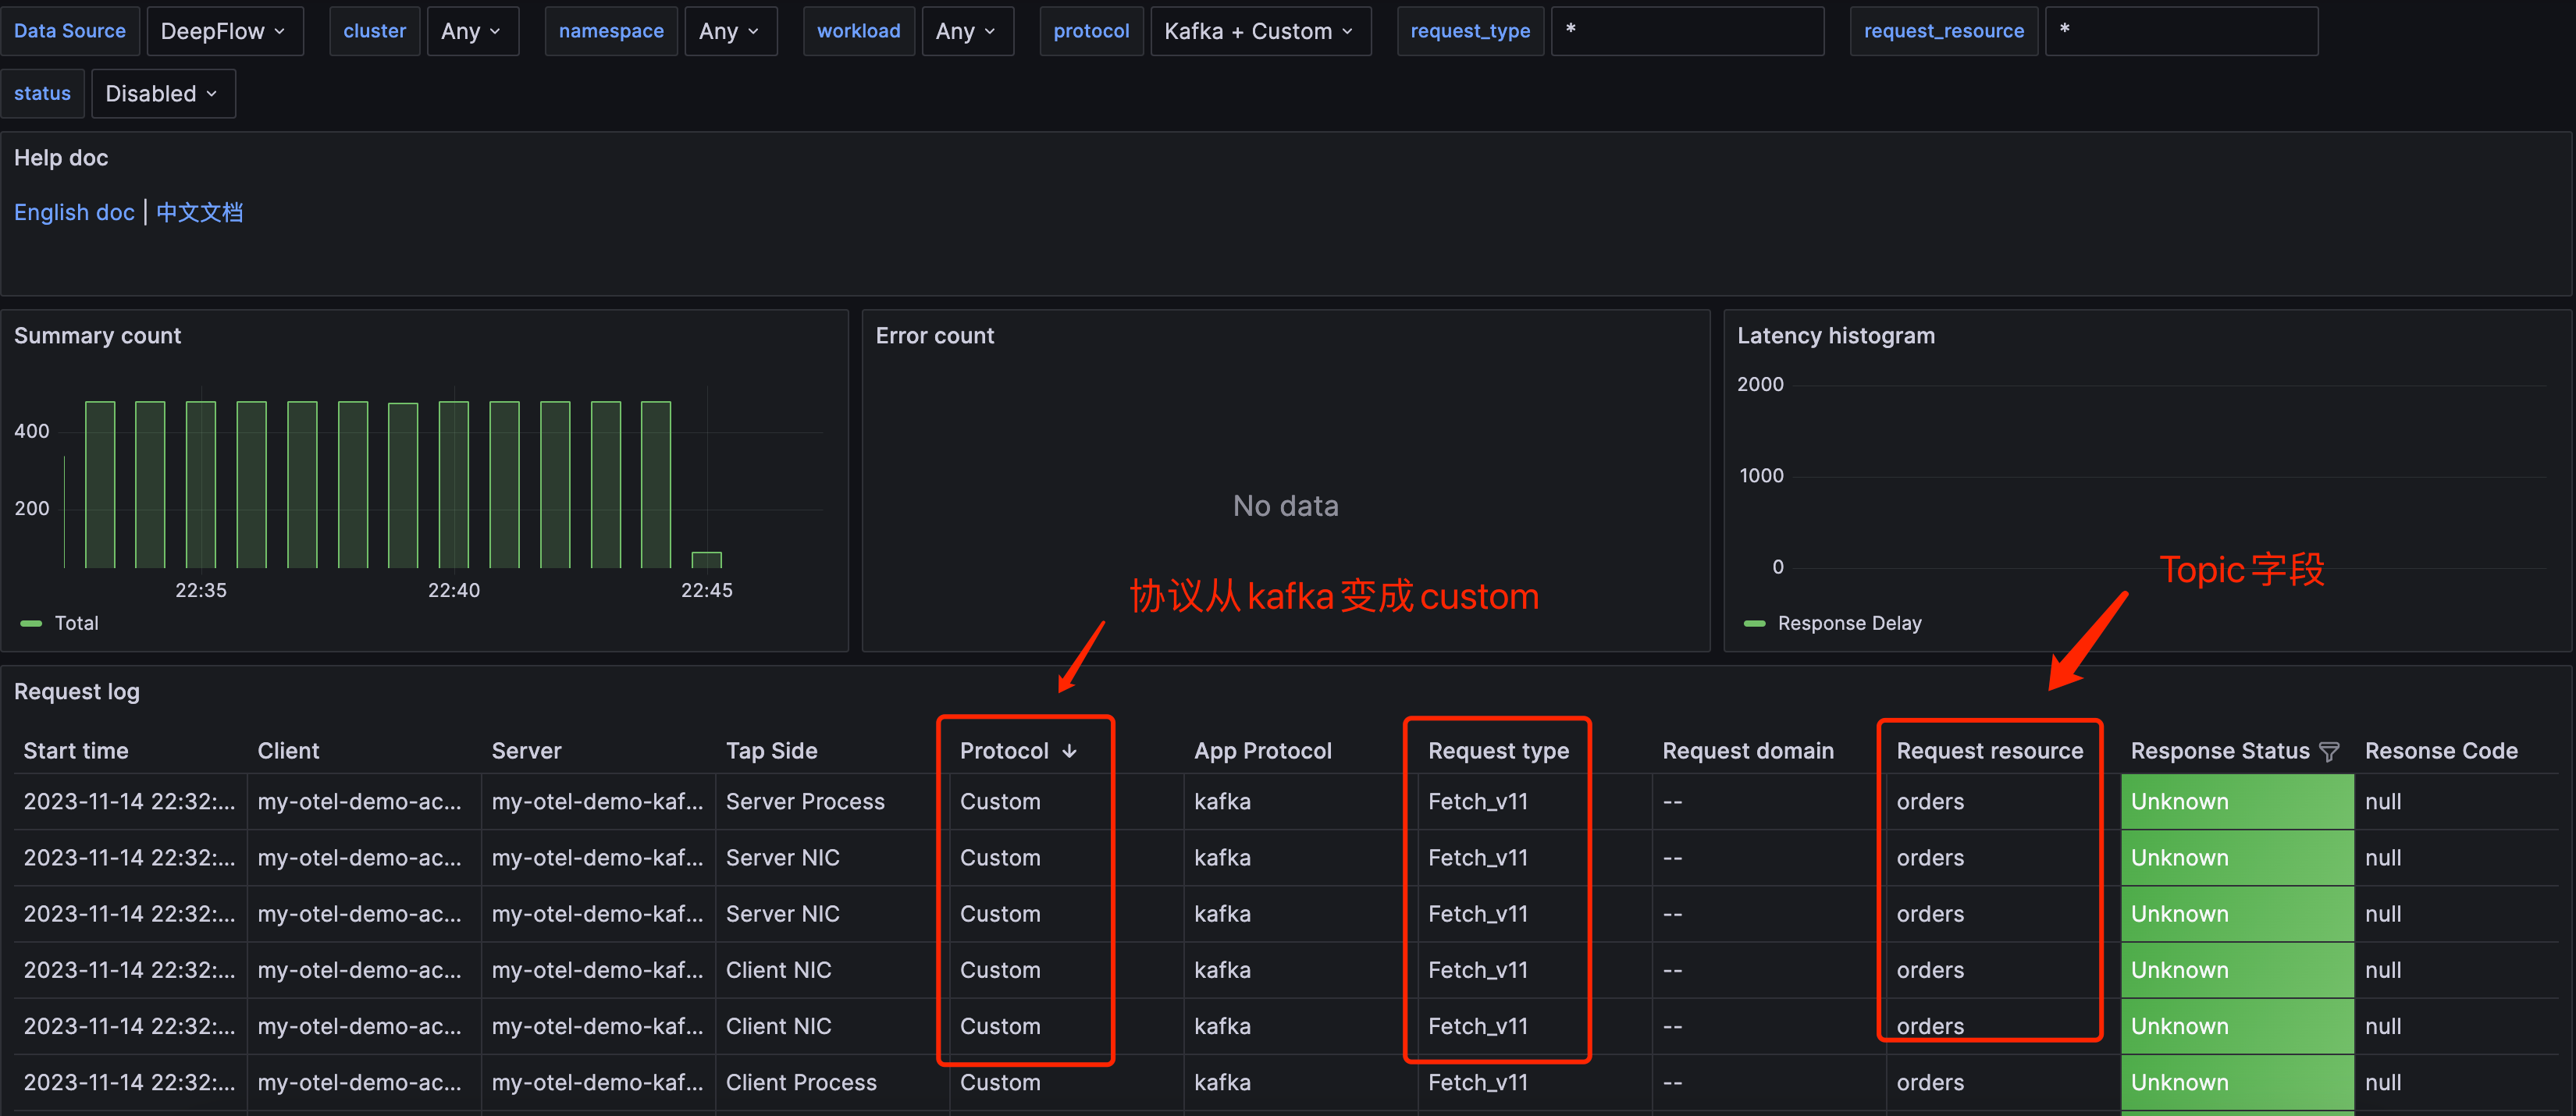
在Grafana上,可以看到原生的Kafka协议被覆盖,出现了几个变化:
Protocol字段从Kafka变成CustomRequest type字段的API多了版本号Request resource字段出现了Topic信息
结语
最后对比一下两个协议扩展的方式,要注意⚠️的是: 两者都存在一个共性问题,就是每增加一个协议,识别协议解码的效率相对降低, 可以通过配置的方式减少需解码的协议数量
原生Rust扩展
优点:
- 运行时的资源占用比插件低
- 支持的功能比插件的丰富,且定制性更灵活
缺点:
- 在语言方面的开发难度比插件的大
- 相对插件开发而言,新增协议需要改动的地方较多,还涉及到Server的一小部分代码
Wasm插件扩展
优点:
- 用Golang开发相对Rust语言难度较低
- 可在运行时通过CLI方式加载
- 扩展性强
缺点:
- Go 的标准库和第三方库有一定的限制,且调试难度大,导致插件异常较难排除
- 由于Wasm本身限制等问题,导致功能相对Rust原生开发较弱
- 资源增加,特别是内存方面。